The VWAP reclaim trading strategy is simple to describe: a strong stock breaks below VWAP on a pullback, then breaks back above it, and that reclaim is your entry. Most traders lose money on it anyway. They trade the reclaim without the four conditions that make it work, and I am going to give you all four, plus a trade I took this week with the exact entry, stop, and target.
I have been trading since 1999 and full time since the end of 2007. I take a lot of reclaim trades. On a strong tape it is one of the most repeatable setups in my playbook, because the deep pullback shakes out weak hands and hands you a mechanical risk level. But the reclaim itself is only the trigger. It is the last 10 percent of the trade. The other 90 percent happens before price ever touches VWAP, and that is the part almost nobody teaches.
TL;DR: The VWAP Reclaim in One Block
A VWAP reclaim is a long entry taken when a strong momentum stock pulls back, loses VWAP, then breaks back above it. The setup requires four conditions stacked in order: a daily chart you already want to buy, a strong morning thrust with trend, a pullback whose depth makes sense given the opening range and ATR getting used up, and a rising Bone Zone that held its structure through the flush. Confirmation is the break back over VWAP with the Bone Zone right there beside it. The stop goes at the bottom of the Bone Zone. The target is high of day, scaling out along the way and trailing the rest using the Free Trade method. I have traded this setup for years and taught it to 7,000 plus students at Bulls on Wall Street, which I founded in 2008.
The Trade: SLS, July 17
Here is what this looks like with real money on the line, not a textbook diagram.
SLS gapped up and ran from 11.50 to about 13.50 at the open. Strong thrust, clean trend, exactly the kind of biotech momentum that makes my morning watchlist. Then the pullback came, and it was a deep one. Price came all the way back into the 12.50 zone and broke under VWAP.
That break under VWAP is where most traders write the stock off. Broken, they say. Failed. On to the next ticker.
Wrong read. Watch what the pullback did not do. The Bone Zone, the shaded area between the 9 EMA and the 20 EMA on my 5 minute chart, was still rising underneath the whole flush. The structure never broke. The trend was resting, not reversing.
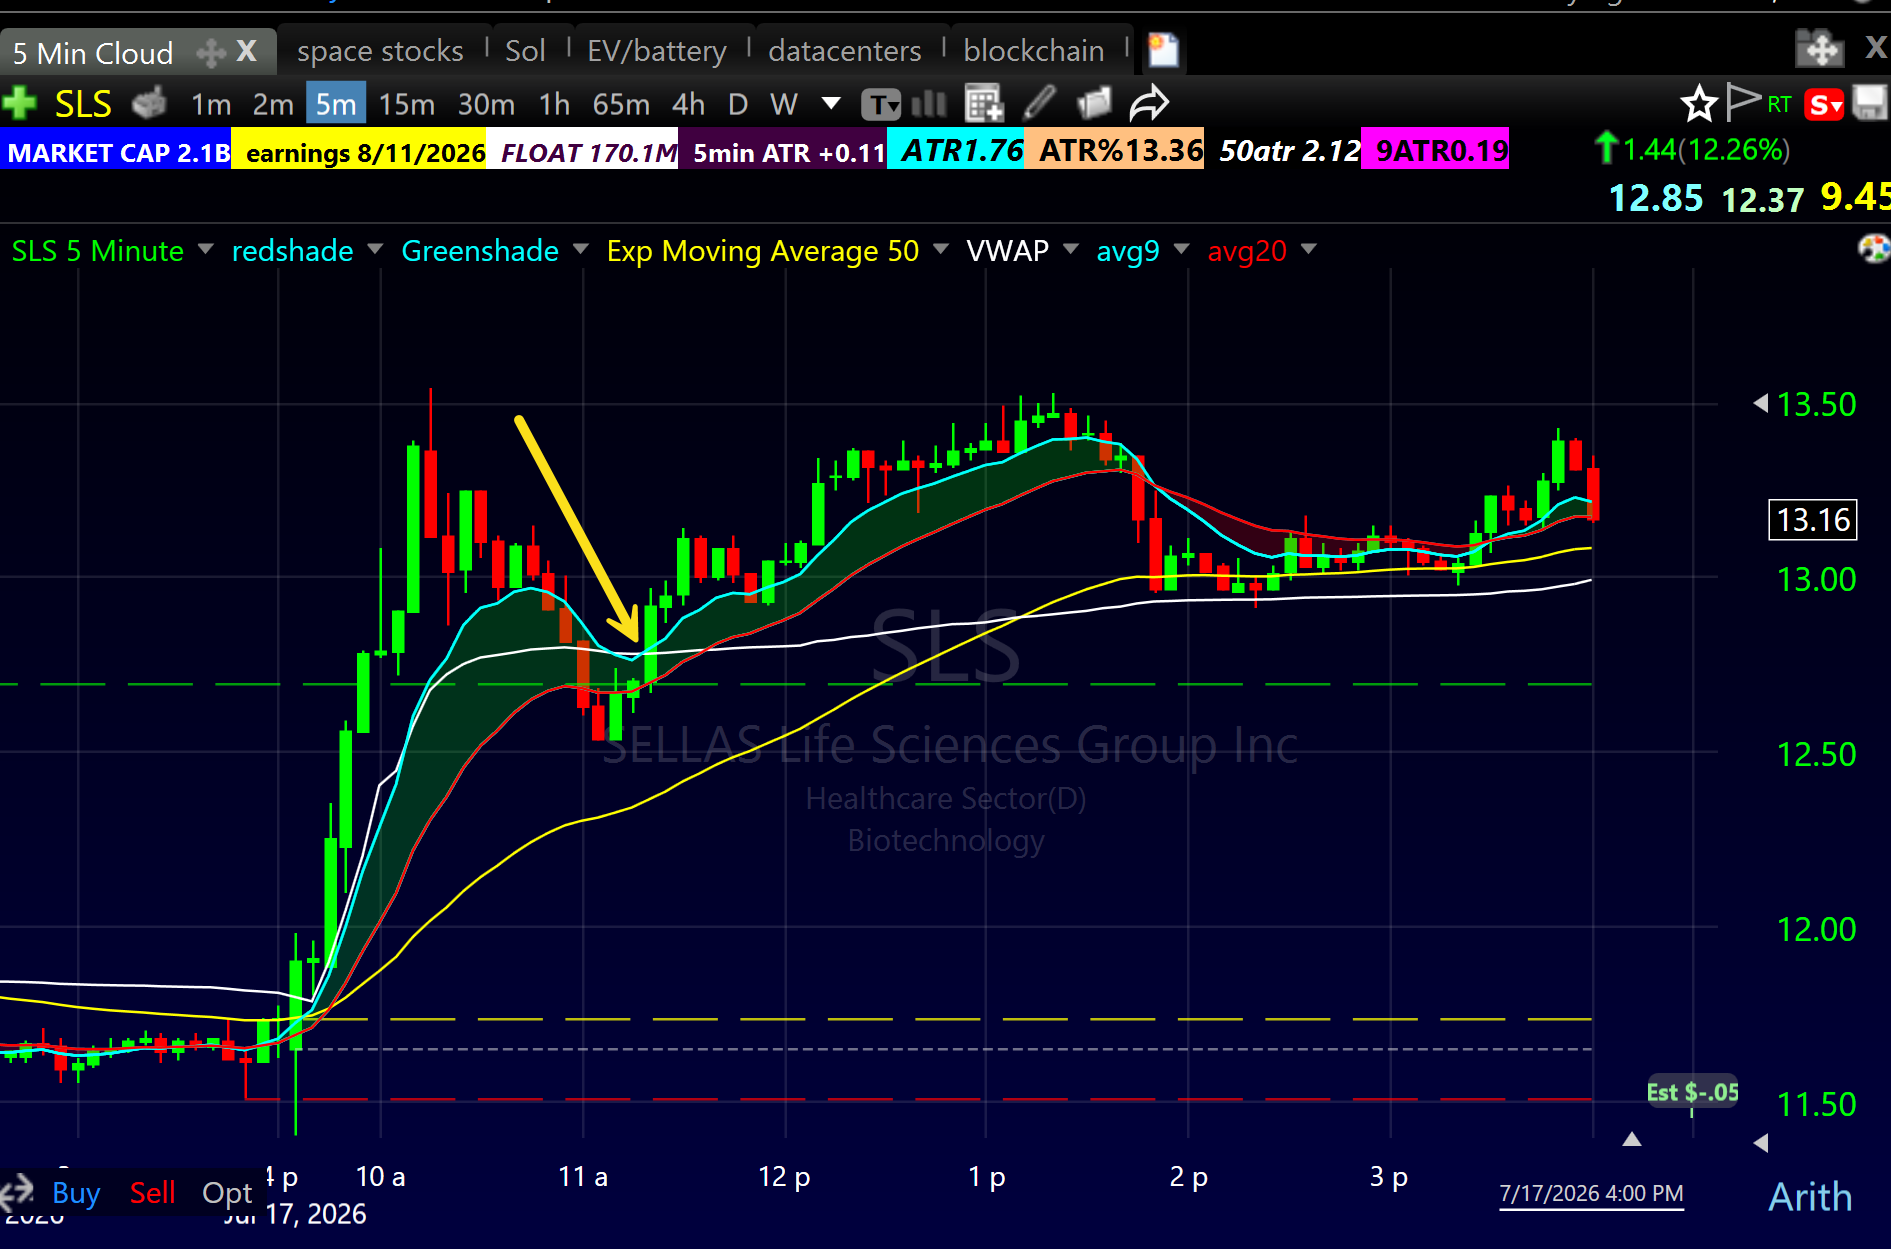
When SLS broke back over VWAP, that was the reclaim. I added at 12.80 and put my stop at 12.65, right at the bottom of the Bone Zone. Fifteen cents of risk. My target was the high of day up around 13.50, seventy cents away. I scaled out along the way and trailed the rest of my position up the Bone Zone using the Free Trade method: sell half into strength, move the stop to entry, let the remainder ride the trend.
Fifteen cents of defined risk against seventy cents of target. That ratio is not luck. It is what the reclaim entry gives you mechanically, because the Bone Zone bottom hands you a stop level that actually means something. If price trades back below the zone after reclaiming VWAP, the setup is wrong and I want out immediately for a small loss.
One note on the charts in this post. They are from TC2000, which is my charting and scanning platform, and TC2000 charts always display a paper trading banner because charting is all I use it for. My live executions run through DAS Trader. If you want the exact layout I trade from, TC2000 is here.
What a VWAP Reclaim Actually Is
Quick definitions so we are speaking the same language. If you need the full ground-up explanation of the indicator itself, read my What Is VWAP post first. And the reclaim is one of the four VWAP setups I trade every single day, all of which are broken down in my full VWAP day trading guide.
VWAP is the volume weighted average price of the session. It is where the real money has traded. When a strong stock pulls back and loses VWAP, every dip buyer from the morning is now underwater on average. When it breaks back above, those trapped longs are freed, shorts who pressed the breakdown are trapped instead, and the stock has fuel.
A reclaim is not the same trade as a bounce, and mixing them up costs people money:
A VWAP bounce is price pulling back TO VWAP, holding it, and turning back up. Price never loses the level.
A VWAP reclaim is price breaking UNDER VWAP, spending time below it, then breaking back above. The level was lost and retaken.
The confirmation is different for each, and I will get to that, because this is where most blown reclaim trades die.
The 90 Percent Before the Trigger
Most traders just buy any stock that breaks back over VWAP. No context, no picture, no plan. That is not a strategy, that is a reflex. Here is the full stack, in order, and every layer has to be there before the trigger means anything.
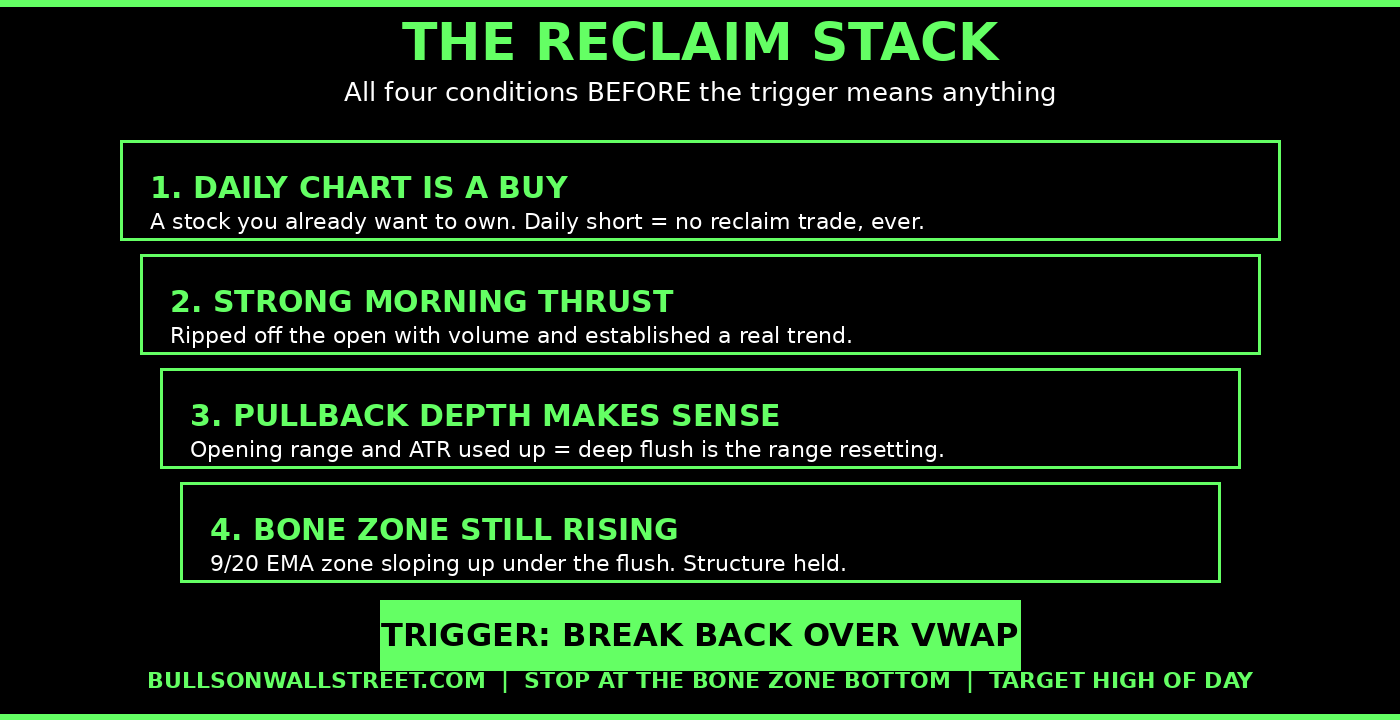
Condition 1: The Daily Chart Has to Be a Buy
This is the filter everything else sits on. The reclaim only exists on a stock you already want to own on the daily chart. You are not looking for a reason to trade. You are looking for a reason to get into a stock you have already decided is strong. If the daily chart is a short, there is no reclaim trade, no matter how clean the 5 minute looks. The intraday setup is just the entry vehicle for a daily chart thesis.
Condition 2: A Strong Morning Thrust With Trend
You need real power in the first move. A stock that grinds up 2 percent on quiet volume does not build the trapped-trader energy that makes a reclaim explode. You want the thrust: a stock that ripped off the open with volume and established a trend. There is academic weight behind this too. Research published on SSRN found that the first half hour of the session predicts the last half hour, and the effect gets stronger on higher volume and higher volatility days (the intraday momentum study is here). Strong opens carry information. My whole morning is built around finding the stocks carrying that information.
Condition 3: The Depth of the Pullback Has to Make Sense
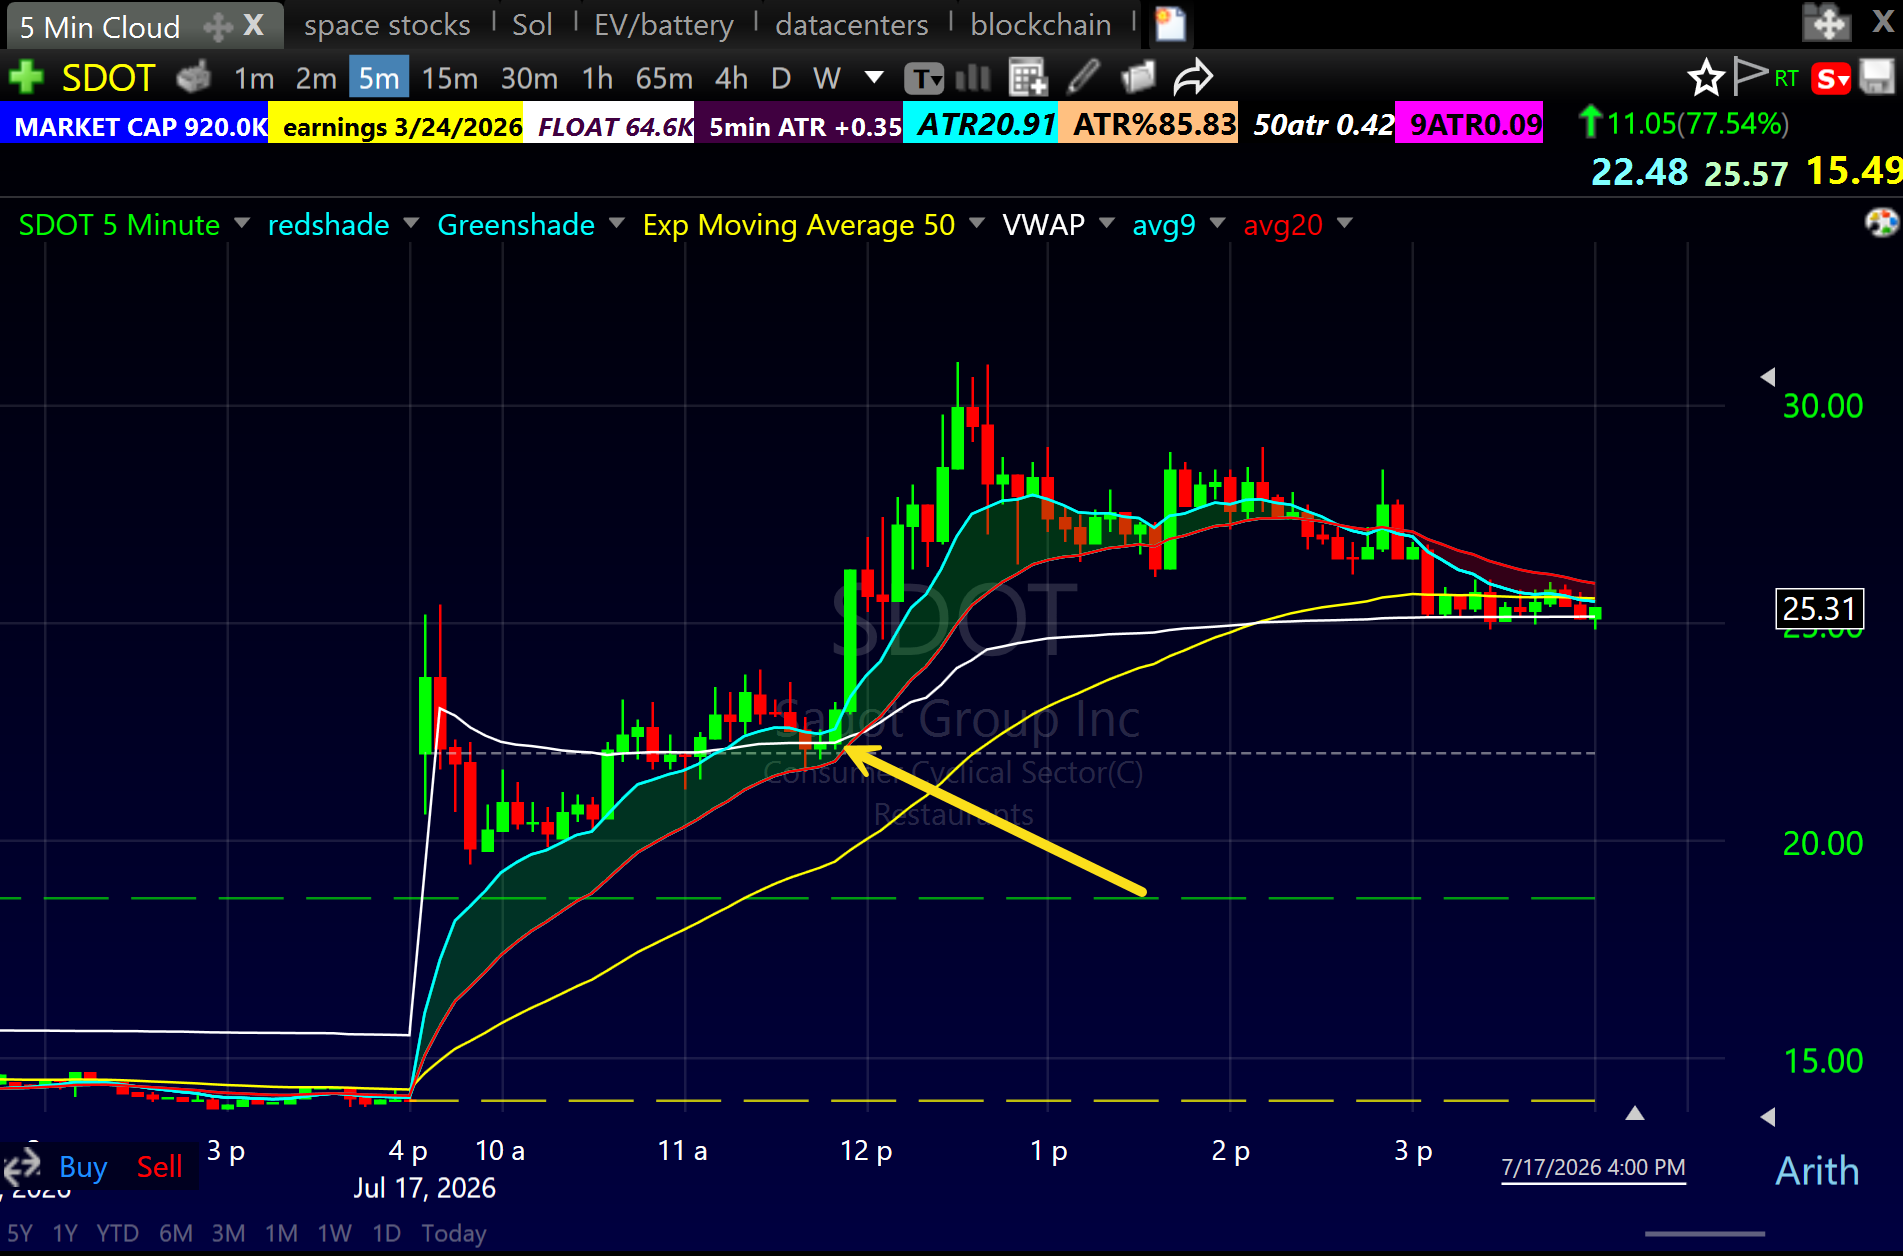
Here is the piece nobody else teaches. When a stock pops really hot at the open, the pullback that follows is often big, and there is a mechanical reason for it. The opening range got used up. Sometimes the entire ATR of the stock got used up in the first thirty minutes. SDOT on Friday ran through 85 percent of its average true range before lunch. When that happens, the stock needs a deeper pullback before it can build the next leg. There is simply no fuel left at the highs.
So a deep flush under VWAP is not automatically weakness. On a stock that already spent its range, the deep pullback is the range resetting. SLS breaking under VWAP into the 12.50 zone was not the trend dying. It was the trend reloading. Reading the pullback through the ATR lens instead of panicking at the VWAP break is the difference between traders who catch the second leg and traders who watch it from the sidelines.
One caution on the hottest names: stocks that burn through their range that fast can also trip single stock circuit breakers, the Limit Up-Limit Down halts the SEC describes here. Know the mechanics of the halt bands before you size up on a low float mover.
Condition 4: The Bone Zone Is Still Rising
This is my confirmation that the trend survived the flush. The Bone Zone is the shaded area between the 9 EMA and the 20 EMA on the 5 minute chart, and it is the backbone of my first pullback strategy. On a real reclaim setup, price breaks under VWAP but the Bone Zone underneath is still sloping up. The moving average structure held while price flushed. That tells you the sellers took out the weak hands without breaking the trend.
Look at every chart in this post. SLS, SDOT, VG, REPL, four different stocks from the same session, and on every single one the reclaim happens with the Bone Zone right there beside the entry. That is not a coincidence. That IS the setup. A trending name, a rising Bone Zone, and VWAP getting retaken all in the same spot on the chart.
If the Bone Zone has rolled over and gone red while price sits under VWAP, walk away. There is no structure left to reclaim into. You would be buying a broken chart and calling it a setup.
Confirmation: The Line Between a Trade and a Guess
The big issue with any VWAP trade, reclaim or bounce, is that people preempt the level. Price gets near VWAP and they buy, before anything confirms, because they are afraid of missing the move. That is not anticipation. That is guessing with size on.
Confirmation depends on which trade you are actually in:
For the reclaim, confirmation is the break back OVER VWAP with the Bone Zone right nearby. Both pieces. The break over the level alone is not enough, because plenty of dead stocks pop through VWAP on one candle and fail. The Bone Zone sitting right at the reclaim is what tells you the trend is intact and the break has structure behind it.
For the bounce, price is holding AT VWAP, so you need a green candle that holds the level before you enter. No green candle holding, no trade. If you want to sharpen how you read those individual candles, my candlestick patterns guide covers the ones that matter.
Preempting feels clever when it works once. Over a hundred trades it is a leak that drains accounts, because every failed preempt is a full stop loss on a trade that never confirmed in the first place.
Managing the Trade
Entry and management are mechanical once the stack is in place:
Enter on the confirmed break back over VWAP. On SLS that was 12.80.
Stop goes at the bottom of the Bone Zone. On SLS that was 12.65. This is not an arbitrary number of cents. It is the level where the setup is proven wrong, because a reclaim that immediately loses the Bone Zone was not a reclaim.
Target is the high of day. The reclaim thesis is that the stock is resuming its trend after resetting its range, and the first objective of a resumed trend is a retest of the highs.
Scale out along the way. I sell pieces into strength as the stock moves toward the target.
Trail the rest up the Bone Zone. Once the first scale is off and the stop is at entry, the trade is free, and the remaining shares ride the zone until it breaks. That is the Free Trade method, and it is how a fifteen cent risk turns into a runner when the second leg extends past high of day.
Size the risk with the 1% Rule. Fifteen cents of risk per share means the share size calculation takes five seconds, and the trade never has the power to hurt the account.
Four Charts, One Session
Friday July 17 put on a clinic. Four names set up the same way in one session. I traded three of them, and I want you to study all four side by side, because seeing the pattern repeat across different stocks is what burns it into your eyes.
SLS was the trade I walked through above. Thrust from 11.50, flush under VWAP into the 12.50 zone, reclaim at 12.80 with the Bone Zone rising underneath, then a grind back toward the highs all afternoon.
SDOT was the wild one, and I took it. A low float mover that ran from under 15 to over 30 with 85 percent of its ATR gone before midday. Look at the midday reclaim with the Bone Zone right at the level. Same setup, faster tape, and on a name moving that fast the Bone Zone stop matters even more because there is no time to think once you are in.
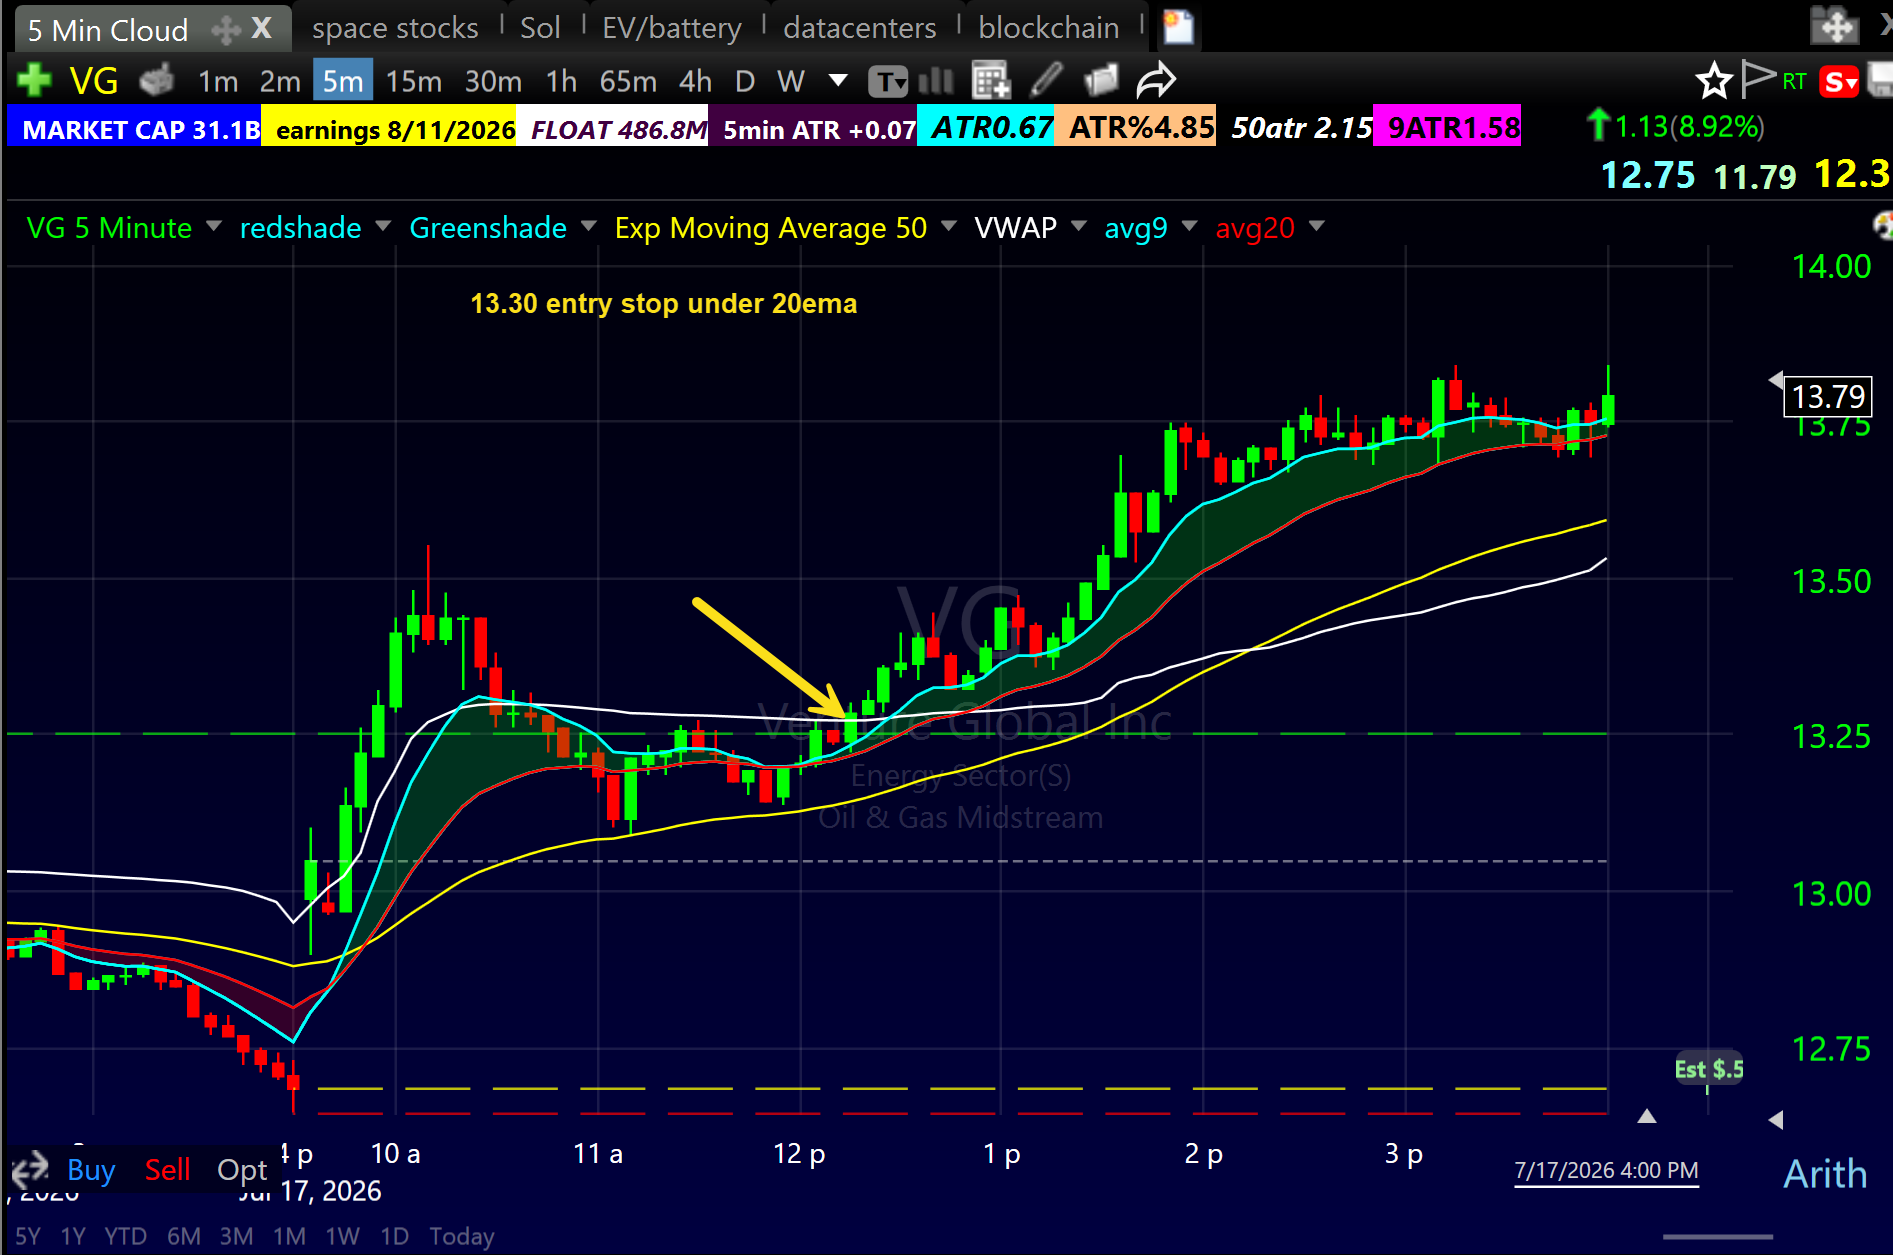
VG shows it on a large cap, and I traded this one too. A 31 billion dollar energy name is a different animal than a low float biotech, and the setup does not care. Morning push, midday pullback to the zone, then the reclaim with the Bone Zone right beside it. My entry was 13.30 with the stop under the 20 EMA, the bottom edge of the Bone Zone, and the stock trended into the close without ever threatening it. Slower tape than SDOT, same shape, same mechanical risk.
REPL is one I did not trade, but it is the cleanest textbook version of the four, which is exactly why it is here. Steady trend, orderly pullback, reclaim right where the Bone Zone meets VWAP, then an afternoon of higher highs. Study this one first if the pattern is new to you.
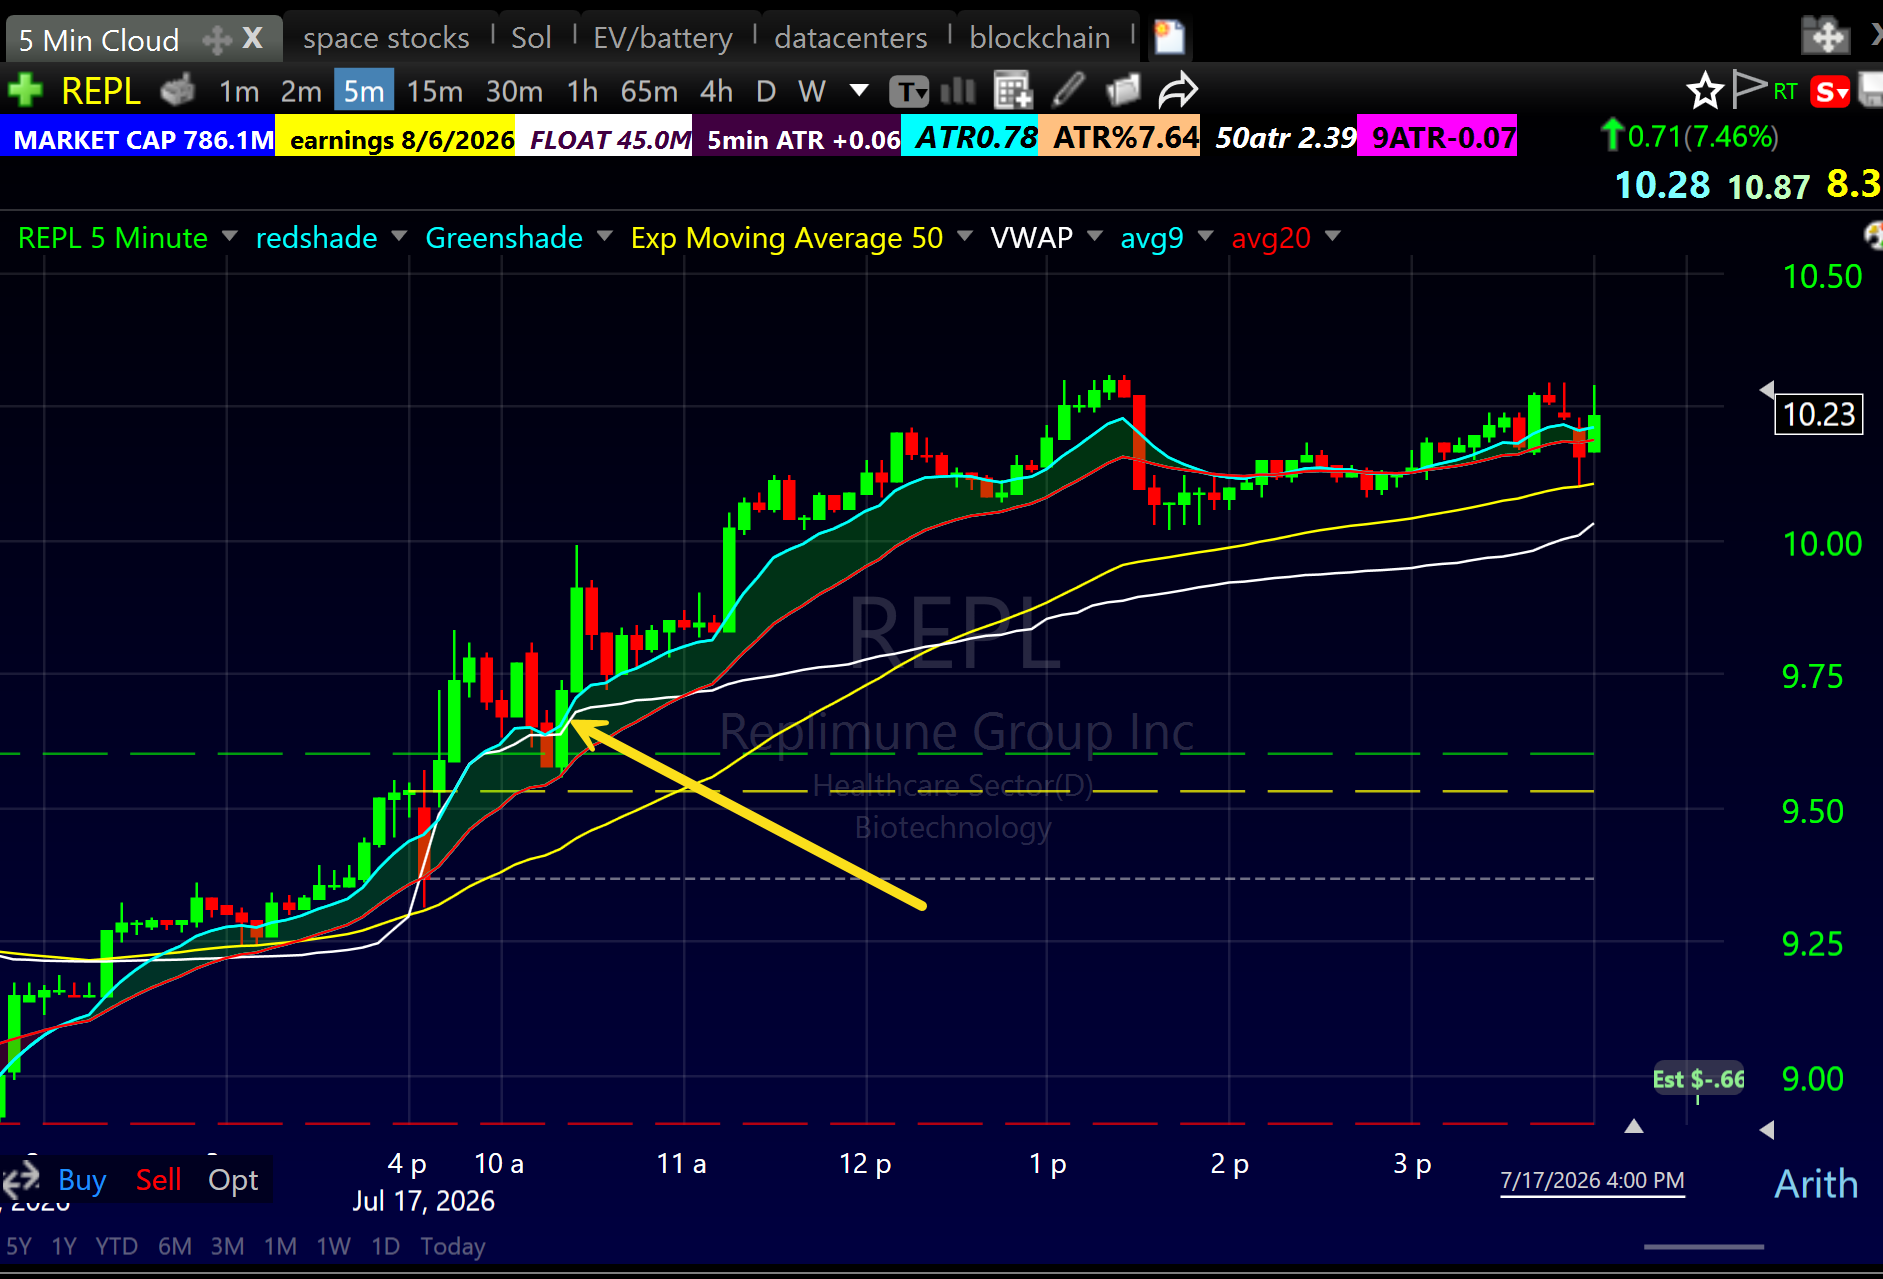
Four tickers, four floats, four sectors, one setup, three of them in my account. That is what a repeatable edge looks like.
How Traders Butcher This Setup
After 7,000 plus students, I have seen every way to lose money on a reclaim. The greatest hits:
Buying the touch instead of the reclaim. Price tags VWAP from below and they hit the button. The level has to be retaken, not visited.
Trading reclaims on stocks they would never buy on the daily. The 5 minute chart of a junk stock can look identical to the 5 minute chart of a leader. The daily chart is what separates them, and skipping that filter turns the setup into a coin flip.
Ignoring the Bone Zone. They see the VWAP break and enter with the moving averages rolled over and stacked bearish underneath. No structure, no trade.
Panicking at the depth of the pullback. They see a stock give back half its morning run and assume it is done, without ever asking how much range the stock had already used. Deep is not the same as broken.
Stops in random places. A dollar below, a round number, a feeling. The Bone Zone bottom is the only stop that reflects the actual thesis of the trade.
No scale plan. They hold the full position for the home run, the stock stalls short of high of day, and a winner rides all the way back to a stop out. Sell pieces. Pay yourself.
FAQ
What is a VWAP reclaim trading strategy?
A VWAP reclaim is a long entry on a strong momentum stock that pulls back, breaks below VWAP, then breaks back above it. The reclaim traps shorts and frees trapped longs, fueling a move back toward the high of day. The setup requires a bullish daily chart, a strong morning thrust, and a rising Bone Zone confirming the trend survived the pullback.
What is the difference between a VWAP reclaim and a VWAP bounce?
A bounce holds VWAP without losing it, and confirmation is a green candle holding the level. A reclaim loses VWAP and then retakes it, and confirmation is the break back over the level with the Bone Zone nearby. They are different trades with different confirmation rules.
Where does the stop go on a VWAP reclaim trade?
At the bottom of the Bone Zone, the shaded area between the 9 EMA and 20 EMA on the 5 minute chart. On my SLS trade that meant entering at 12.80 with a stop at 12.65. If price loses the Bone Zone after reclaiming VWAP, the setup has failed and the trade should be exited immediately.
What is the target on a VWAP reclaim?
High of day. The thesis of the reclaim is trend resumption, and a resumed trend retests its highs first. I scale out into strength on the way there and trail the remaining shares up the Bone Zone rather than exiting everything at one price.
Why do strong stocks pull back so deep before reclaiming VWAP?
Because a hot open uses up the opening range and often most of the daily ATR. When the range is spent, the stock needs a deeper reset before the next leg has fuel. A deep pullback on a stock that already ran its full range is the range resetting, not the trend failing.
Does the VWAP reclaim work on large cap stocks?
Yes. The four examples in this post from a single session include SLS and REPL in biotech, SDOT as a low float small cap, and VG at a 31 billion dollar market cap. The setup is about trend, range, and structure, none of which care about market cap. Size and volatility change the speed of the trade, not the shape of it.
Can you short a VWAP reclaim in reverse?
The mirror image exists: a weak stock on a bearish daily chart that pops above VWAP and then loses it can be a short entry, called a VWAP rejection or failed reclaim. The same stack applies in reverse, including a falling Bone Zone confirming the downtrend. But do not force a short on a stock whose daily chart is strong.
What timeframe should I use for VWAP reclaim trades?
I trade reclaims off the 5 minute chart, which is also where I draw the Bone Zone. VWAP itself is the same on every timeframe since it is a session level, but the 5 minute gives enough structure to read the pullback without the noise of the 1 minute.
How do I find stocks for VWAP reclaim setups?
Start with the daily charts. Build a watchlist of stocks you would want to own, then wait for the ones that gap and thrust in the morning. I scan for these in TC2000 every morning before the open, ranking gappers by float, volume, and daily chart quality.
Do I need to wait for a candle close over VWAP to confirm the reclaim?
I want to see the break over VWAP holding with the Bone Zone at the level, and a 5 minute close over VWAP is the cleanest version of that confirmation. Buying the first tick through the level is closer to preempting than confirming. The few cents saved by jumping early are not worth the failed reclaims you eat.
The Setup Is the Easy Part
Here is the truth about the VWAP reclaim, and about every setup on this site: the pattern is the easy part. You could memorize everything in this post in an afternoon. What you cannot memorize is the judgment. Which daily charts are actually worth buying. Whether this morning thrust has real power or is a pump waiting to fade. Whether the pullback is an ATR reset or a genuine failure. That judgment comes from screen time next to someone who already has it.
That is exactly what the 60-Day Trading Bootcamp is built for. Live classes at night, homework on real charts, and my screen in front of you every morning while I trade setups like this one with real money. No live trading during class, because you learn the system first, prove it in the simulator, and go live when your own data says you are ready. And if you want to watch the reclaim traded live before committing to anything, my morning sessions on YouTube are free.
The reclaim will set up again next week. The only question is whether you will recognize all four layers or just the trigger.
Kunal Desai is the CEO and founder of Bulls on Wall Street. A professional trader since 2007, he has navigated every major market cycle -- from the 2008 financial crisis to today's high-volatility environments. Having mentored 7,000+ students through his live trading bootcamps, Kunal trades live every morning in the Bulls on Wall Street Trading Chatroom and is dedicated to teaching real-world execution and high-probability strategies. Based in Miramar Beach, Florida.
Connect with Kunal: Read his full story | Instagram | YouTube