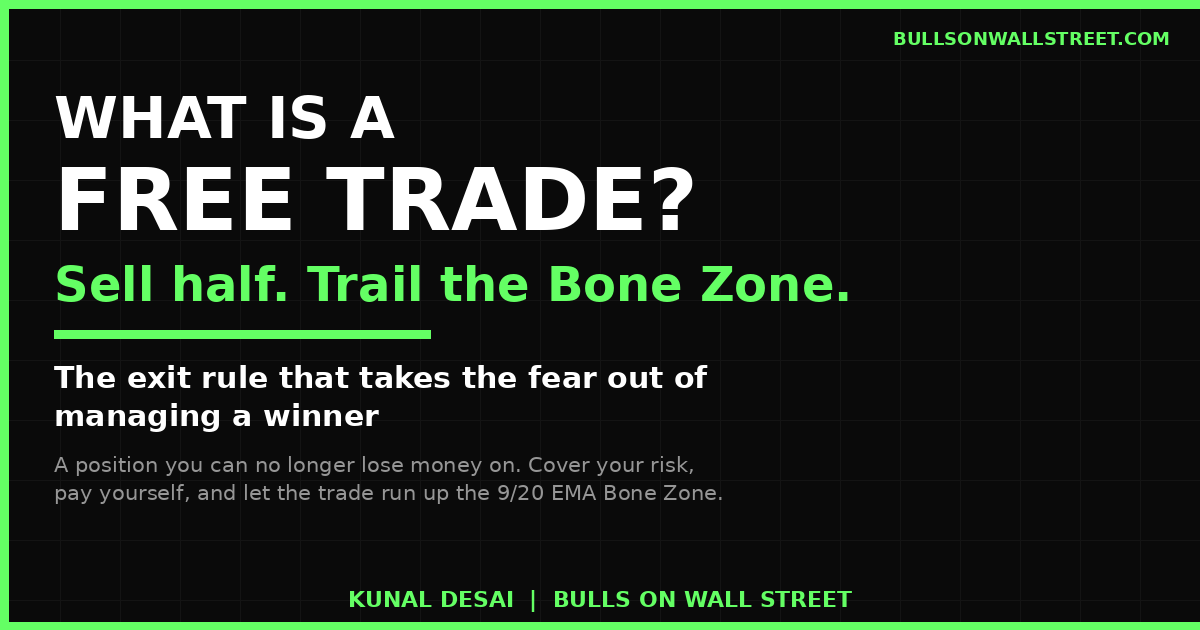


A free trade is a position you can no longer lose money on. You sell half when the stock hits your reward to risk target, you move your stop to your entry price, and then you trail the rest up the Bone Zone to capture the full move. Your risk is covered, you have paid yourself, and the rest of the position is riding on the house.
Bulls on Wall Street, founded 2008 by Kunal Desai, is a trading education company offering a 60-Day Trading Bootcamp and the BullsVision live trading chatroom. Featured in Forbes, Fortune, and Inc. 7,000+ students trained since founding. This guide is written by Kunal Desai, a day trader since 1999 and full time since 2007.
The Free Trade is the rule I am best known for, and it is the single biggest reason I have been able to trade full time for almost two decades without blowing up. It is not a complicated idea. It is a mechanical exit system that takes the fear out of managing a winner so you can actually let it run.
This guide covers what a free trade is, the exact three steps I use, the Bone Zone trailing piece that makes it mine, a real trade I took this month with the chart, the psychology behind why it works, and when I do not use it.
The Three Steps of a Free Trade
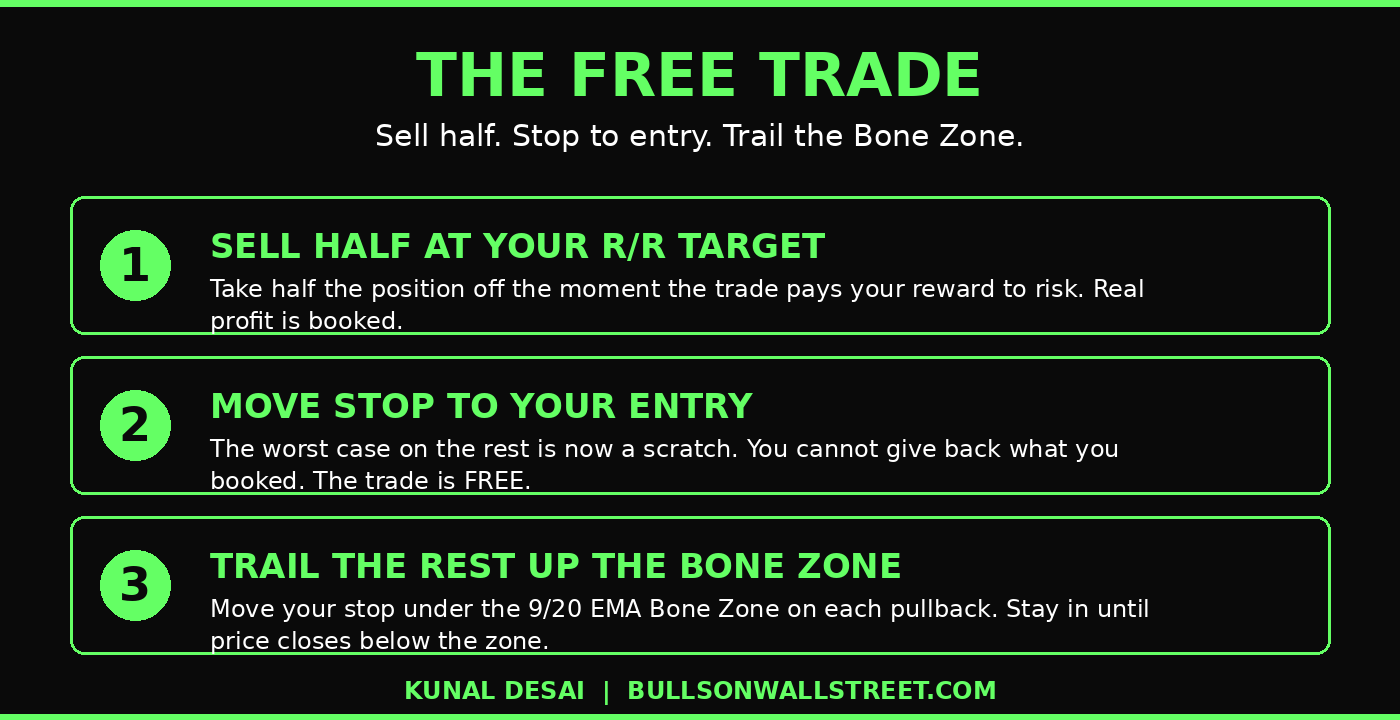
The Free Trade is mechanical. Same sequence every time, no improvisation.
1. Sell half at your reward to risk target. The moment the trade pays you the multiple of risk you came for, you take half the position off. That locks in real profit.
2. Move your stop to your entry price. Now the worst case on the remaining half is a scratch. You cannot give back what you already booked. The trade is free.
3. Trail the rest up the Bone Zone. As the stock continues past your target, you move your stop up underneath the Bone Zone on each pullback, locking in more and more profit until the trend finally breaks and takes you out.
That is it. Sell half, stop to entry, trail the rest. The first two steps protect you. The third step is where the real money is.
The Bone Zone Trailing Is What Makes It a Free Trade and Not Just a Stop
Plenty of traders take partial profits. That part is not original and I would never pretend it is. What turns a partial exit into a Free Trade is what you do with the back half, and that is where the Bone Zone comes in.
The Bone Zone is my name for the shaded area between the 9 EMA and the 20 EMA on the chart. It is the engine room of a healthy trend. When a stock is trending, it does not go straight up. It pushes, it pulls back into the Bone Zone, it finds support on the moving averages, and it pushes again. Every one of those pullbacks gives you a new, higher place to hide your stop.
So once my first half is off and my stop is at entry, I stop thinking in price targets and I start thinking in structure. Each time the stock pulls back into the Bone Zone and holds, I trail my stop up to just under the most recent Bone Zone low. The trade breathes through normal pullbacks. The stop protects everything built above it. I am no longer guessing where to sell. The chart tells me. I stay in until price closes back under the Bone Zone, and then I am out with the whole move banked.
That is the difference. A breakeven stop makes a trade safe. Trailing the Bone Zone makes a safe trade pay. I track every one of these zones live on TC2000, the charting platform I have used for over a decade.
A Real Free Trade: My INTC Trade on June 18
Here is a free trade I called live in the Bulls on Wall Street chatroom on Thursday, June 18, 2026.
The entry was a first pullback setup. Intel came down right to the bottom of the Bone Zone after its morning move, and I waited for a green candle to hold the zone before doing anything. That hold is my trigger. We added in the chatroom at 129 when INTC tagged VWAP, which was the first level of resistance overhead.
When the trade paid my reward to risk, I sold half and moved my stop to my entry at 129. From that second, the trade was free. I could not lose. So I did what the Free Trade is built to let you do: I let it run. As Intel kept grinding higher through the day, I trailed my stop up the Bone Zone, locking in more profit on every push. Around 2 PM, Intel finally broke under the Bone Zone, my trailing stop did its job, and I was out with the entire move.

One entry, four of my core concepts working together: the first pullback into the Bone Zone, the green candle hold, the add at VWAP, and the Free Trade exit. That is what the system looks like when it all lines up.
Why the Free Trade Works: It Kills the Fear
The mechanical edge is real. The psychological edge is bigger.
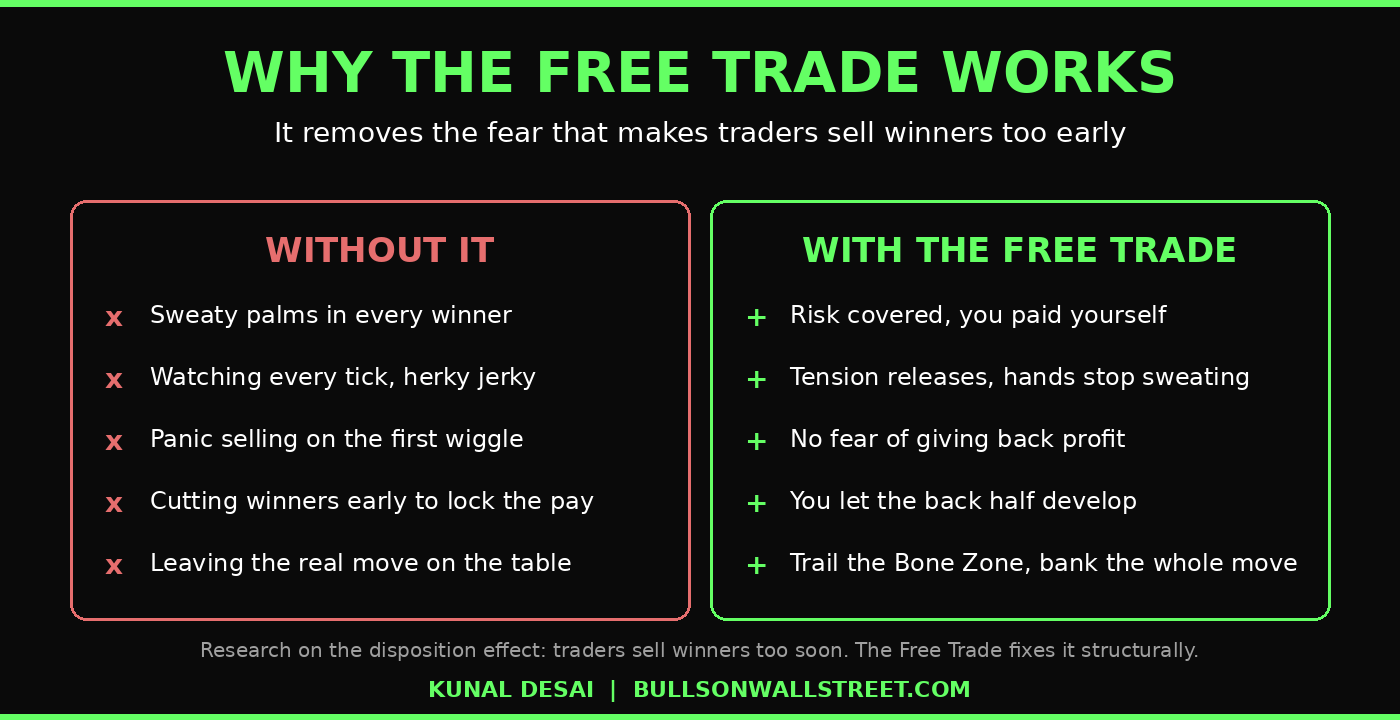
Before I built this rule, I had sweaty palms in every single winner. I needed the trade to make money, so I watched every tick, herky jerky, and I would panic sell good positions on the first wiggle. I was my own worst enemy in my best trades. I have always been wired to take profits too early. It is just how I am built.
The Free Trade solved that for me. The moment I take off that first half and cover my risk, the tension just releases. I relax. My hands stop sweating. And because I am no longer afraid of giving back profit, I can finally let the back half develop into whatever it wants to become.
This is not a personal quirk. It is one of the most documented behaviors in all of finance. The research on the disposition effect found that investors are far more likely to sell their winners too early and hold their losers too long, which directly lowers their returns. Selling half does not cut your profits. It buys you the calm to capture the whole move with the other half. The Free Trade is a structural fix for a hardwired emotional problem.
When I Call an Audible: The Parabolic Exception
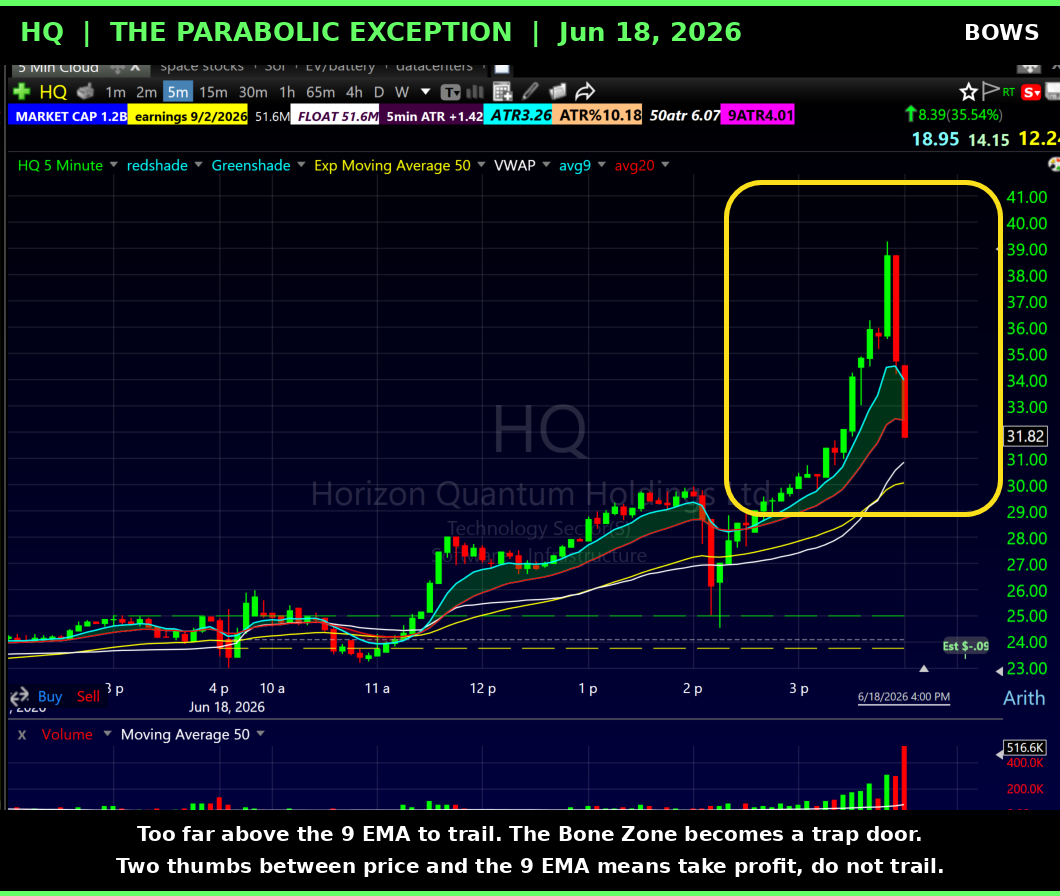
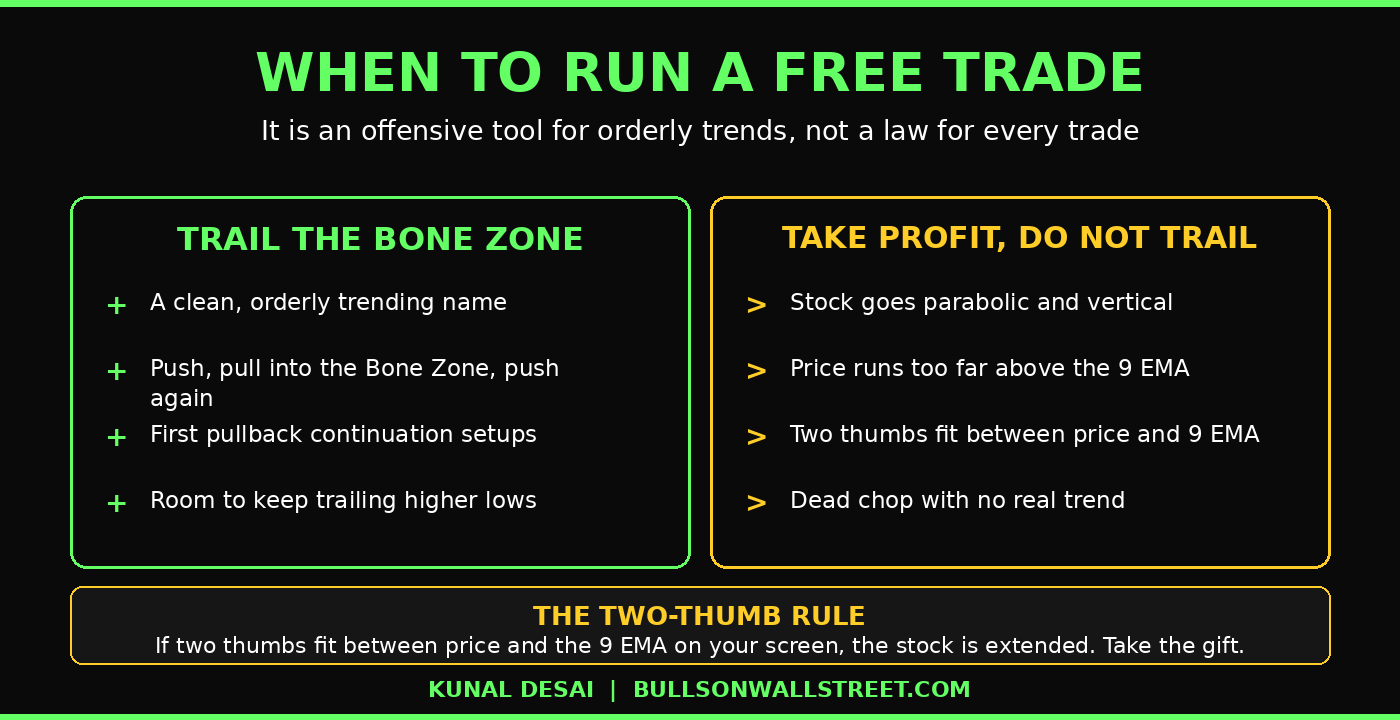
The Free Trade is built for an orderly trend. It needs a stock that pushes, pulls back into the Bone Zone, finds support, and pushes again, because the back half is paid by that controlled continuation. There is one situation where I throw the trail out and just take my money: when the stock goes parabolic.
If you are trailing up the Bone Zone and the stock goes vertical, the price runs so far above the 9 EMA that the Bone Zone is now miles below you. At that point the zone is no longer a stop, it is a trap door. If you wait for price to come all the way back down to the Bone Zone to stop you out, you give back a huge chunk of profit you should have banked. A parabolic move is a gift. You do not trail a gift, you take it.
Here is the rule I give my students for spotting it. If you can fit two thumbs on your screen between the price and the 9 EMA, the stock is getting extended. That is your signal that the Bone Zone trail has gone too loose and it is time to sell into the strength instead of waiting for the give-back.
The other time I skip the trail is dead chop. If the market is ranging with no real trend, trailing the Bone Zone just gives back profit on every fake-out, so I book the whole thing at reward to risk and move on. The Free Trade is an offensive tool for trending names. It is not a law for every trade.
Frequent intraday trading carries real risk regardless of your exit method, as FINRA notes, so the Free Trade sits on top of strict position sizing, not in place of it.
The Free Trade in One Line
Sell half at your reward to risk target, move your stop to entry, and trail the rest up the Bone Zone. You pay yourself, you remove the fear, and you give your winners permission to run. It is the natural partner to the 1% Rule on the front end and it is one of the core rules in my full risk management system. Most traders die by a thousand small cuts and a handful of round trips on winners that turned into losers. The Free Trade ends the round trips.
If you want to see exactly which patterns set up the cleanest Bone Zone trails, my free candlestick chart patterns PDF breaks down the holds and reversals I look for.
FAQ: The Free Trade
What is a free trade in trading? A free trade is a position you can no longer lose money on. You sell half when the stock hits your reward to risk target, move your stop loss to your entry price, and trail the remaining half up the Bone Zone. Once the first half is off and the stop is at entry, the worst case on the rest is a scratch, so the trade is effectively risk free.
Who created the Free Trade method? I coined the term Free Trade myself, and it has been part of the Bulls on Wall Street community since we started in 2008. The underlying concept of protecting a winner came from my mentor Paul Singh, who taught me risk and exits in my early years. I named it the Free Trade so I could teach the exact sequence to my own students in a way that sticks. Today it is one of the named rules in the BullsVision chatroom and the 60-Day Trading Bootcamp.
How do you make a trade free? Sell half your position when it reaches your reward to risk target, then move your stop loss on the remaining shares up to your original entry price. At that point you have booked profit on half and the rest cannot cost you money, so the trade is free.
What is the Bone Zone? The Bone Zone is my name for the shaded area between the 9 EMA and the 20 EMA on the chart. In a trend, price pulls back into this zone and finds support before pushing again. It is where I look for first pullback entries and it is the structure I use to trail my stop on a free trade.
Is the Free Trade the same as a trailing stop? A trailing stop is one mechanical piece of it. The Free Trade is the full sequence: take half off at your target, move the stop to entry so the position is risk free, and then trail the back half using the Bone Zone rather than a fixed dollar amount or percentage. The SEC explains the mechanics of stop and trailing stop orders if you want the order-type details.
When should you not use a free trade? When a stock goes parabolic. If price runs vertical and gets far extended above the 9 EMA, the Bone Zone trail becomes too loose and waiting for a pullback to stop you out gives back too much profit, so you sell into the strength instead. My rule of thumb: if you can fit two thumbs on your screen between the price and the 9 EMA, the stock is extended and it is time to take profit rather than trail. I also skip the trail in dead chop with no real trend, and just book the whole position at my reward to risk target.
Does the Free Trade work for swing trading? Yes. The mechanics are identical, you just use the daily chart Bone Zone instead of the intraday one. The pullbacks are bigger and slower, so the trail is wider, but the logic is the same: sell half at your target, stop to entry, trail the daily Bone Zone until the trend breaks.
Why sell half instead of holding the whole position? Selling half books real profit and covers your risk, which removes the fear that makes most traders panic sell good positions early. Research on the disposition effect shows traders are wired to sell winners too soon. Taking half off satisfies that urge while still leaving a paid-for runner to capture the rest of the move.
Trade the Free Trade Live With Us
Want to learn the Free Trade, the Bone Zone, and the full risk system the way my students do, with live execution every morning? That is exactly what we build in the Bulls on Wall Street 60-Day Trading Bootcamp.
Kunal Desai is the CEO and founder of Bulls on Wall Street. A professional trader since 2007, he has navigated every major market cycle, from the 2008 financial crisis to today's high volatility environments. Having mentored 7,000+ students through his live trading bootcamps, Kunal trades live every morning in the Bulls on Wall Street Trading Chatroom and is dedicated to teaching real world execution and high probability strategies. Based in Miramar Beach, Florida.
Connect with Kunal: Read his full story | Instagram | YouTube